
Happy Tuesday, my garb-minded friends! Today, we’re going to talk about a topic that doesn’t get a whole lot of discussion except in criticism–how to prep your fabric before you even get sewing, including washing and ironing. Caring for fabric (and even garb) is a little different from caring for your regular clothes, but following a few simple steps before you get started on a sewing project can really save you a lot of headache during your project and enhance the quality of your finished product.
1. Know your fabric.
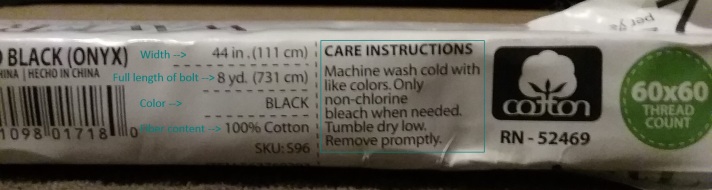
Step 1 takes place before you even take your fabric home. When you’re purchasing your fabric at the fabric store, read the end of the bolt to get a bunch of info about the fabric, including fiber content, width, washing instructions, and more. Until you get more familiar with fabric or if you purchase a type of fabric you haven’t used before, I highly recommend taking a picture of the end of the bolt.
2. Hem your fabric.
I wash all of my fabric I will use for garb before I sew with it, but before I wash it, I hem the edges!
Fabrics do all kinds of things when they’re washed, but one of the worst things that can happen is the edges of your carefully measured fabric fraying and unraveling in the washer and dryer. You can plan for this by purchasing extra fabric yardage, or you can finish the edges before you wash the fabric.
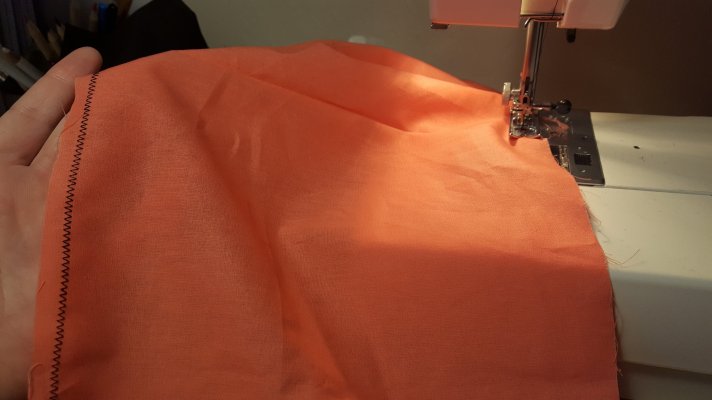
There are a few different ways you can finish your edges, but I recommend zigzag stitching or serging your edges. Serging requires a special machine.
Zigzag:
- Set your machine to a zigzag stitch. I do this on my machine by turning the stitch selector knob to the zigzag setting and turning my stitch width knob up to 3 or 5. It’s okay for the stitch length to remain long–we just want a zigzaggy line, not a solid wide line like when we’re appliquéing.
- Stitch about ¼ to ½ inch in from the edge on both cut edges. You don’t need to zigzag stitch the selvages.
Serge:
- Line up the cut edge of your fabric with the cutting blade of the serger.
- Stitch the length of the cut edges. You don’t need to serge the selvages.
3. Wash your fabric.
I’m gonna be honest, “to wash or not to wash” is a huge question among those in the sewing community. I am firmly in the “wash it, dangit” camp because I am terrified of fabric shrink and bleed. It’s gonna get washed eventually anyway, so you might as well wash the fabric beforehand to be aware of any of these issues.
You have two options when washing your fabric:
- Wash it according to the instructions on the bolt, OR
- Wash it how you realistically will wash it when it’s garb. Be honest with yourself.
A few tips:
- Completely unfold the fabric and gently, loosely loop it around the agitator (if you’re using a top-loading washer).
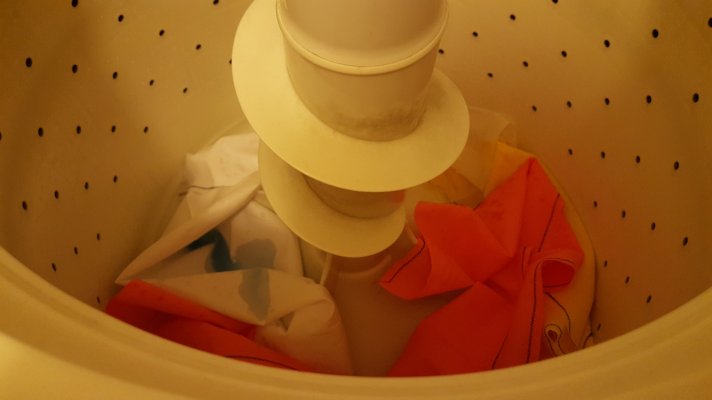
Don’t overload your washer or throw the fabric in all wadded up! - Use a color catcher! Color catchers are pretty much the universe’s gift to garbers. You might want to use two for the first wash for especially bold colors or reds.
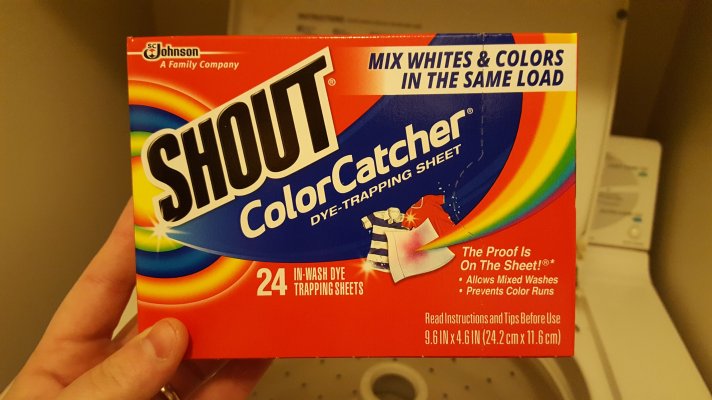
I -love- these things. - Wash different colors separately (especially vastly different colors, and ESPECIALLY reds).
- Don’t overload your washer.
- Be aware of your temperature settings. Hot water causes fabric fibers to expand, which can cause the dye to release from the fabric, which can cause bleed. Cold, cool, or warm are best for washing fabrics, with cold being best if you’re not sure if the fabric is color-safe. Cold water also helps set dyes.
4. Dry your fabric.
Dry your fabric following one of the two schools of thought above–either according to instructions or how you expect to dry it when it’s garb.
A few tips:
- Clean out your lint trap beforehand because it will likely fill up (especially with linen and fleece).
- Use dryer sheets to help deal with static.
- Use heat if the fabric allows it (it helps release the wrinkles because of the steam).
- Untwist your fabric gently when transferring from the washer to the dryer. Any twists in the fabric can result in deep creases, damp patches, or even stretching or distortion of the fabric. You can also snip or very gently tear any frayed strings that might keep the fabric twisted or compressed.
- Take the dried fabric out of the dryer promptly and fold, hang, or iron it immediately.
5. Fold your fabric neatly.
If you aren’t going to iron your fabric immediately, it’s best to fold it neatly and put it away. Get someone to help you fold your long cuts of fabric evenly so it doesn’t warp or wrinkle too horribly!
6. Hang your fabric.
If you can’t really fold your fabric, you can hang it instead (for example, over the shower rod).
7. Iron your fabric before marking cutting designs.
If you’re like me, you probably rarely iron, so you might not be sure of the proper way to do it! Here are some pointers.
- Set your iron to the hottest setting that won’t damage your fabric. For 100% cotton and 100% linen, that’s full blast, baby.
- Make sure your ironing board is clean! You have to replace your ironing board cover once in a while so it doesn’t leave gunk on your fabric.
- Make sure your iron is clean! Things like interfacing, synthetic fabrics, and starch (and ironed-over pins…) can gunk up your iron. There are commercial iron cleaners available in stores. There are also cleaning methods on the internet. Check your steam vents for chalky buildup, too–this is probably mineral deposits left by your tap water. You may want to use distilled water for steam if this is an issue, or you can use a separate spray bottle and forgo your steam feature on your iron entirely. From the voice of experience: dirty irons can ruin fabric. 😦
- Steam is not usually necessary if you iron straight out of the hot dryer; however, it’s great if the fabric has little gentle wrinkles all over. 100% cotton and 100% linen can be steamed, but not all fabric types can be! Double check!
- As for ironing board types–there are several! I personally prefer one that is at least 60 inches wide because the widest fabric I regularly use is 60 inches wide. I also recommend a large freestanding ironing board. However, I currently use an over-the-door flip-down ironing board that is about 45 inches long. This type of ironing board is good for me because it stays in the room where I do most of my sewing and it’s easy to set up and put away, which helps eliminate the excuses I try to make about ironing. 🙂 (Side note: small apartment/dorm ironing boards are best for small things like sleeves and collars, but they totally work if that’s what you have to work with!)
- Let your iron heat up. The iron should have an indicator light that shuts off when the iron has heated up completely.
- Place your fabric with the cut edge parallel to the long edge of the board and your selvages parallel to the end of the board.

I use relatively inexpensive irons because I have a habit of dropping and breaking them, and because I abuse them with interfacing and such. This one (it’s a Hamilton Beach) has been pretty sturdy, though. - Press the iron firmly down against the fabric and move it around in a kind of sweepy, squiggly motion, from the inside of the fabric out or from one side to the other, until all of the wrinkles are straightened.
- Never leave your iron hot-side down on a piece of fabric–many fabrics burn, distort, or melt very quickly. As a general rule, if the iron is face down, it should be in motion.
- If you are using steam, turn that on before ironing. If you are using a spray bottle, spray the fabric on the ironing board before ironing.
- If your fabric is longer than the distance from the board to the floor, you probably want to gently roll the fabric as it pools at your feet to help prevent creases (which are especially possible while the fabric is still warm).
There’s a lot of detail here, but I promise, following these steps makes a clear difference in your end product! Happy crafting! ❤ Lisael
